
11 min. read
Show me your entropy and I’ll break your password
PART 2: Insights from Entropy. This article highlights how the entropy of a password can expose sensitive information and the potential risks associated with it.
Good news everyone! The developer documentation for the Passbolt API was updated, and it’s now better, faster, stronger.

Let’s be honest, Passbolt OpenAPI specification was due for a makeover. Some sections were missing, and a few details were a bit off. It definitely needed a little bit of love! So, sleeves got rolled up, and every endpoint, parameter, and response was reviewed, polished, and perfected. Now, the API documentation is sharp, precise, and fully ready to unleash the full power of the Passbolt API. No more guesswork.
To complement the revamped OpenAPI spec, Redoc has been integrated to deliver a more interactive experience. Redoc transforms the documentation into an intuitive, user-friendly interface that enhances the way developers interact with the API.
Nobody wants to waste time digging through vague documentation. Whether it’s integrating workflows, automating routine tasks, or building new features, these updates are designed to save developers time and make working with the Passbolt API straightforward and efficient.
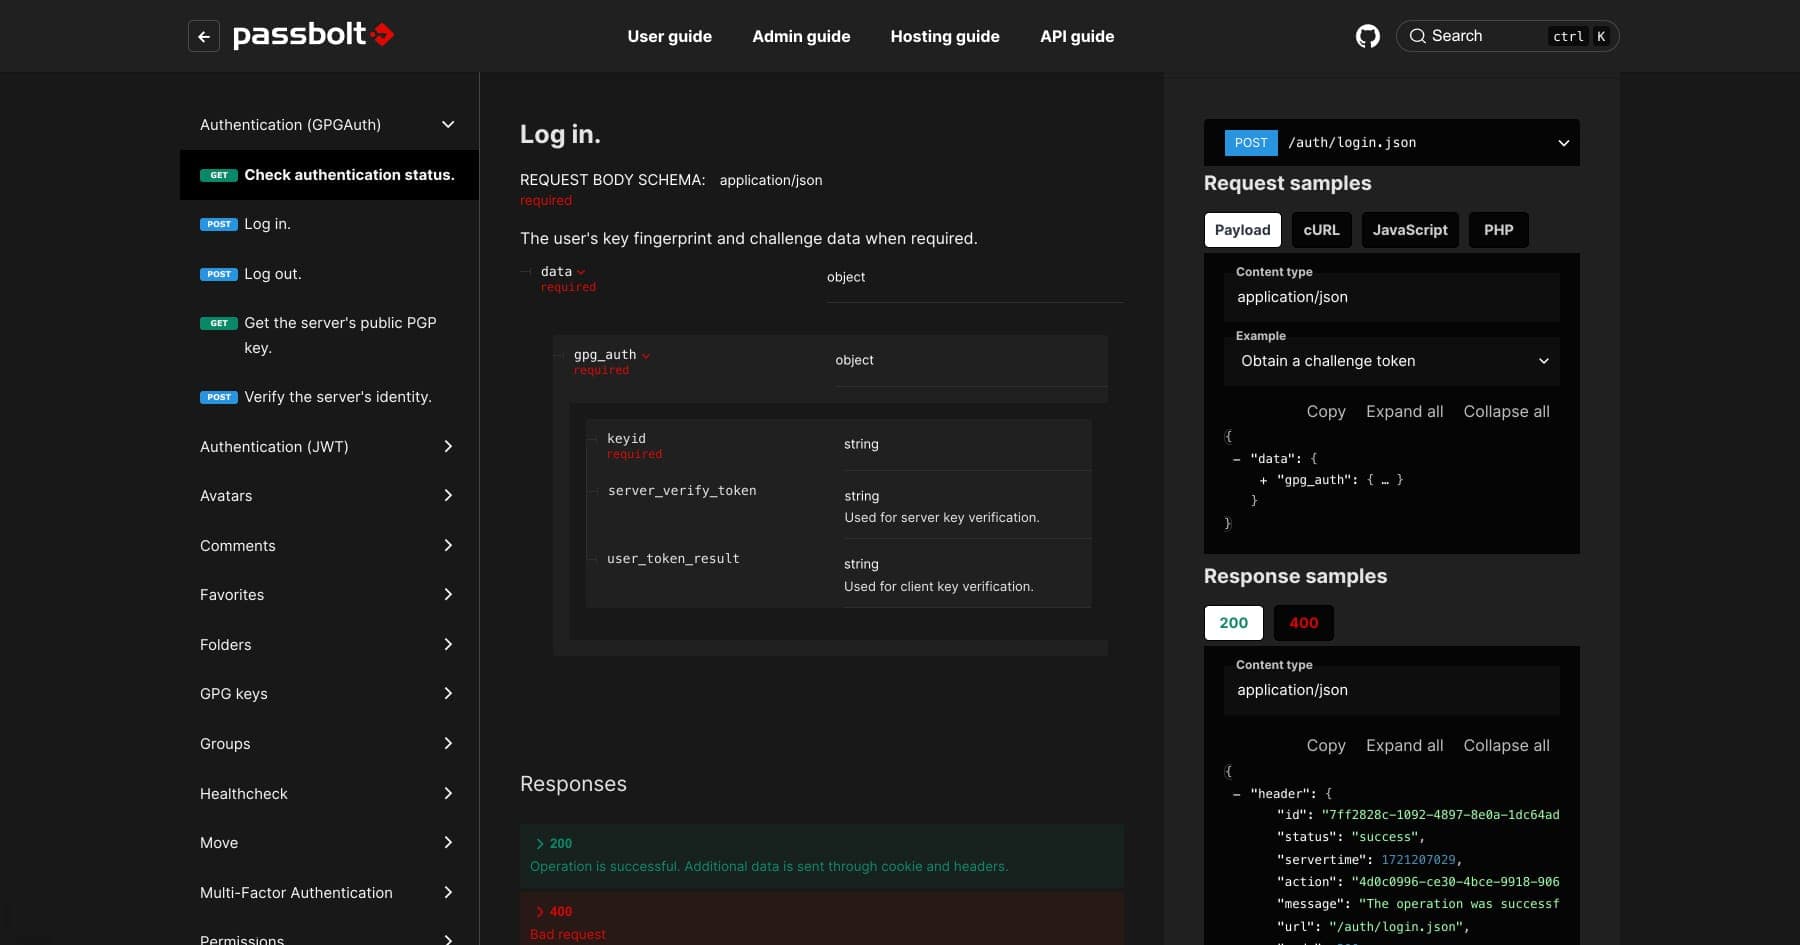
Redoc puts every API endpoint right where it should be—front and center. Request methods, parameters, responses, all in one neat package.
The new API guide interface shows each endpoint’s request and response structure in real time. No need for guesswork or trial and error—everything from required fields to expected outputs is neatly organized. For example, when working on user authentication, the exact fields needed for a POST request to /auth/login are right there, along with what the response will look like.
For each endpoint, there are examples showing request bodies and expected responses. No more “what does this thing even do?” moments—it's all laid out
Each endpoint now includes detailed parameter breakdowns, with clear markers for required and optional fields. Working on managing resources? The API guide spells out exactly what data needs to be sent when creating or updating a secret—examples included.
All responses—including those pesky error codes—are displayed alongside the request formats. A 400 Bad Request or a 401 Unauthorized no longer leaves anyone scratching their head. The guide explains what went wrong and how to fix it.
Getting Redoc and the docusaurus-powered help site to play nicely together? That took some tinkering. With Redocusaurus, Redoc is fully embedded into the help site, no sacrifices on functionality, just seamless browsing.
The API docs now live happily alongside the rest of Passbolt’s guides. Whether checking out the API or browsing through the user guides, everything’s in one place, no hopping between different versions of the website.
In the past, Passbolt primarily used the GpgAuth protocol, which required multiple steps and could be a bit cumbersome. Now the updated documentation and API bring a refreshed version called GpgJwtAuth into the spotlight, simplifying the authentication process. Fewer steps, less hassle, more focus on getting things done.
On the new API helpsite, the following page will give you all the bells and whistles to authenticate with a JWT.
Once you have your token, it’s time to create a new password entry using the API. The updated documentation makes it easy to find the POST /resources endpoint.
Request:
POST /resources.json HTTP/1.1
Host: your-passbolt-instance.com
Authorization: Bearer your-jwt-token
Content-Type: application/json

{
  "name": "New Service",
  "username": "[email protected]",
  "uri": "https://newservice.com",
  "resource_type_id": "a28a04cd-6f53-518a-967c-9963bf9cec51",
  "secrets": [
    {
      "data": "-----BEGIN PGP MESSAGE-----\n...\n-----END PGP MESSAGE-----",
      "user_id": "your-user-id"
    }
  ]
}
Explanation:
Response:
{
  "header": {
    "id": "unique-request-id",
    "status": "success",
    "servertime": 1620000000,
    "action": "create-resource",
    "message": "The resource was successfully created.",
    "url": "/resources.json",
    "code": 200
  },
  "body": {
    "id": "new-resource-id",
    "name": "New Service",
    "username": "[email protected]",
    "uri": "https://newservice.com",
    "created": "2024-10-16T12:00:00+00:00",
    "modified": "2024-10-16T12:00:00+00:00",
    "created_by": "your-user-id",
    "modified_by": "your-user-id",
    "resource_type_id": "a28a04cd-6f53-518a-967c-9963bf9cec51",
    "secrets": [ ... ]
  }
}
This is just the beginning. With Passbolt V5 on the horizon, the documentation will soon be updated to support encrypted metadata and new content types. More flexibility, more power—perfect for those managing secrets at scale.
In the meantime, the updated API documentation is ready to be explored. Take it for a spin, experiment, and share any thoughts or questions on the community forum. Feedback from the community drives the next steps, and everyone’s building this together.
Happy coding!
The Passbolt Team
11 min. read
PART 2: Insights from Entropy. This article highlights how the entropy of a password can expose sensitive information and the potential risks associated with it.
4 min. read
Automate Passbolt server maintenance with a custom bash script. Manage disk space effectively, improve performance, and schedule tasks for reliable upkeep.